A Disturbance at the Birdfeeders

Many of us are used to having unwelcome visitors to our feeders and gardens. Squirrels, rabbits, even deer are common visitors to our yards.   Whole businesses are out there dedicated to creating garden pest deterrents and squirrel-proof bird feeders.  But, nothing is a match for what came to visit Peggy’s feeders.
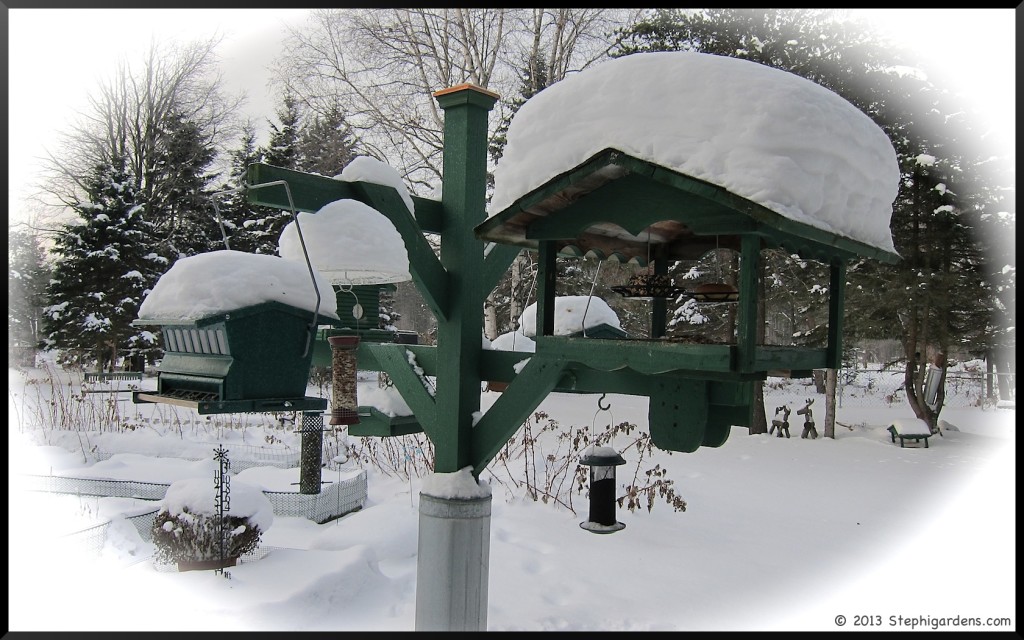
Here’s a before…

Bird feeders on a pole

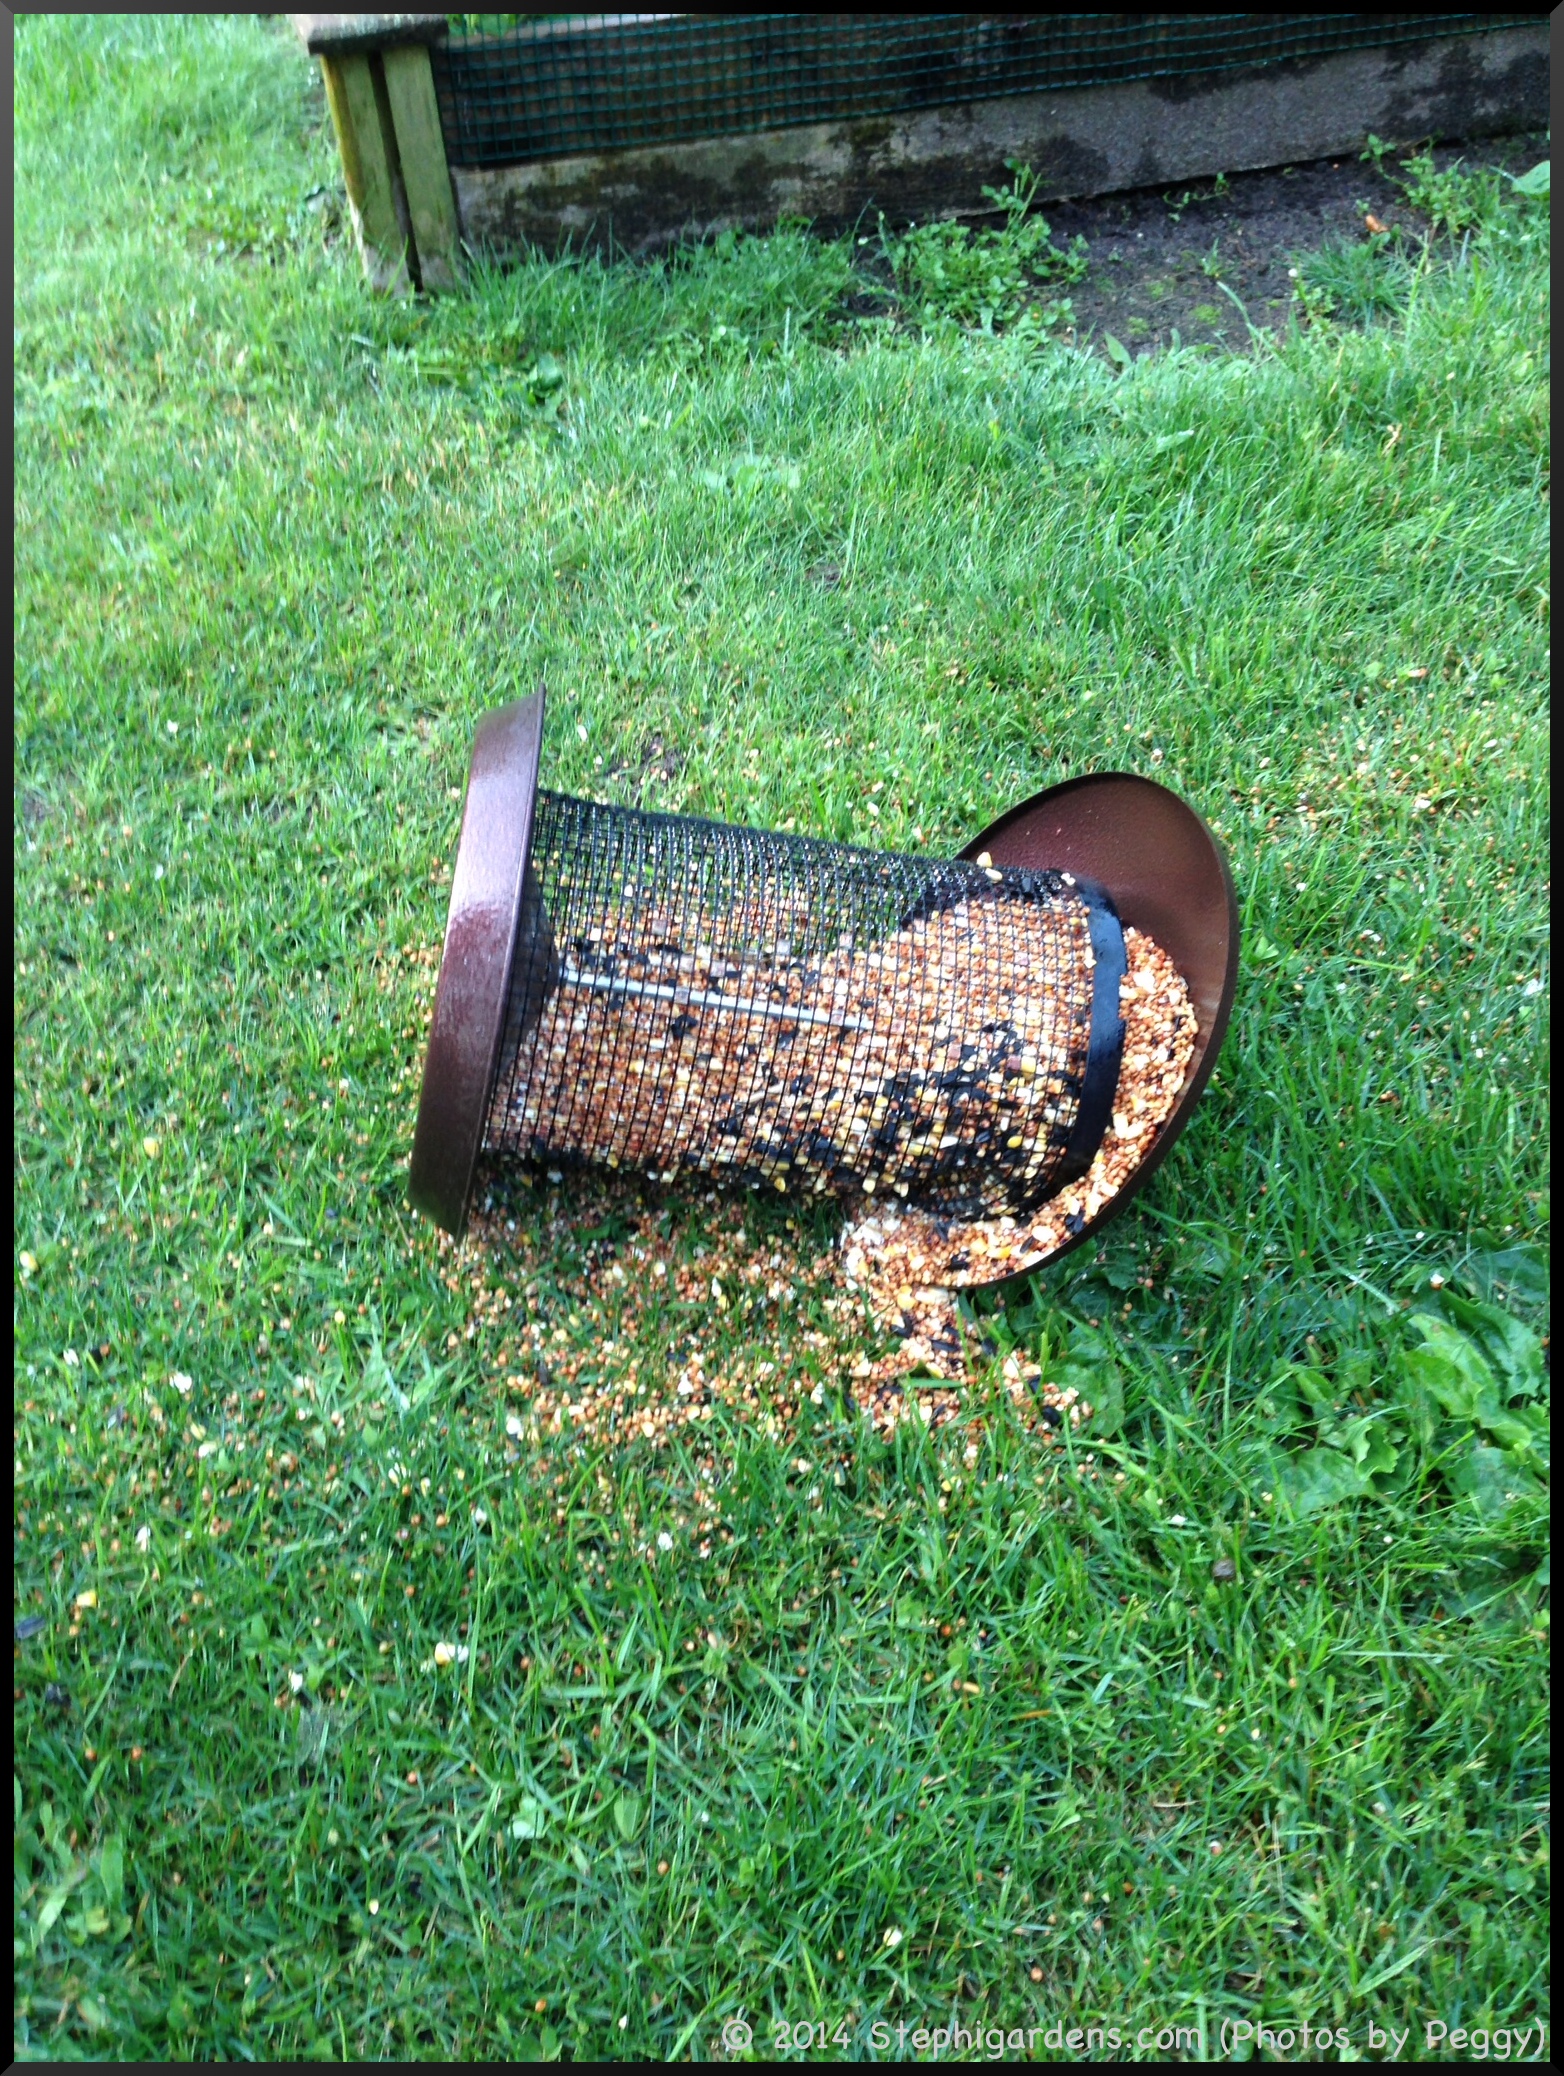
Then, one morning a couple of weeks ago, this is what she woke up to…

black bear damage

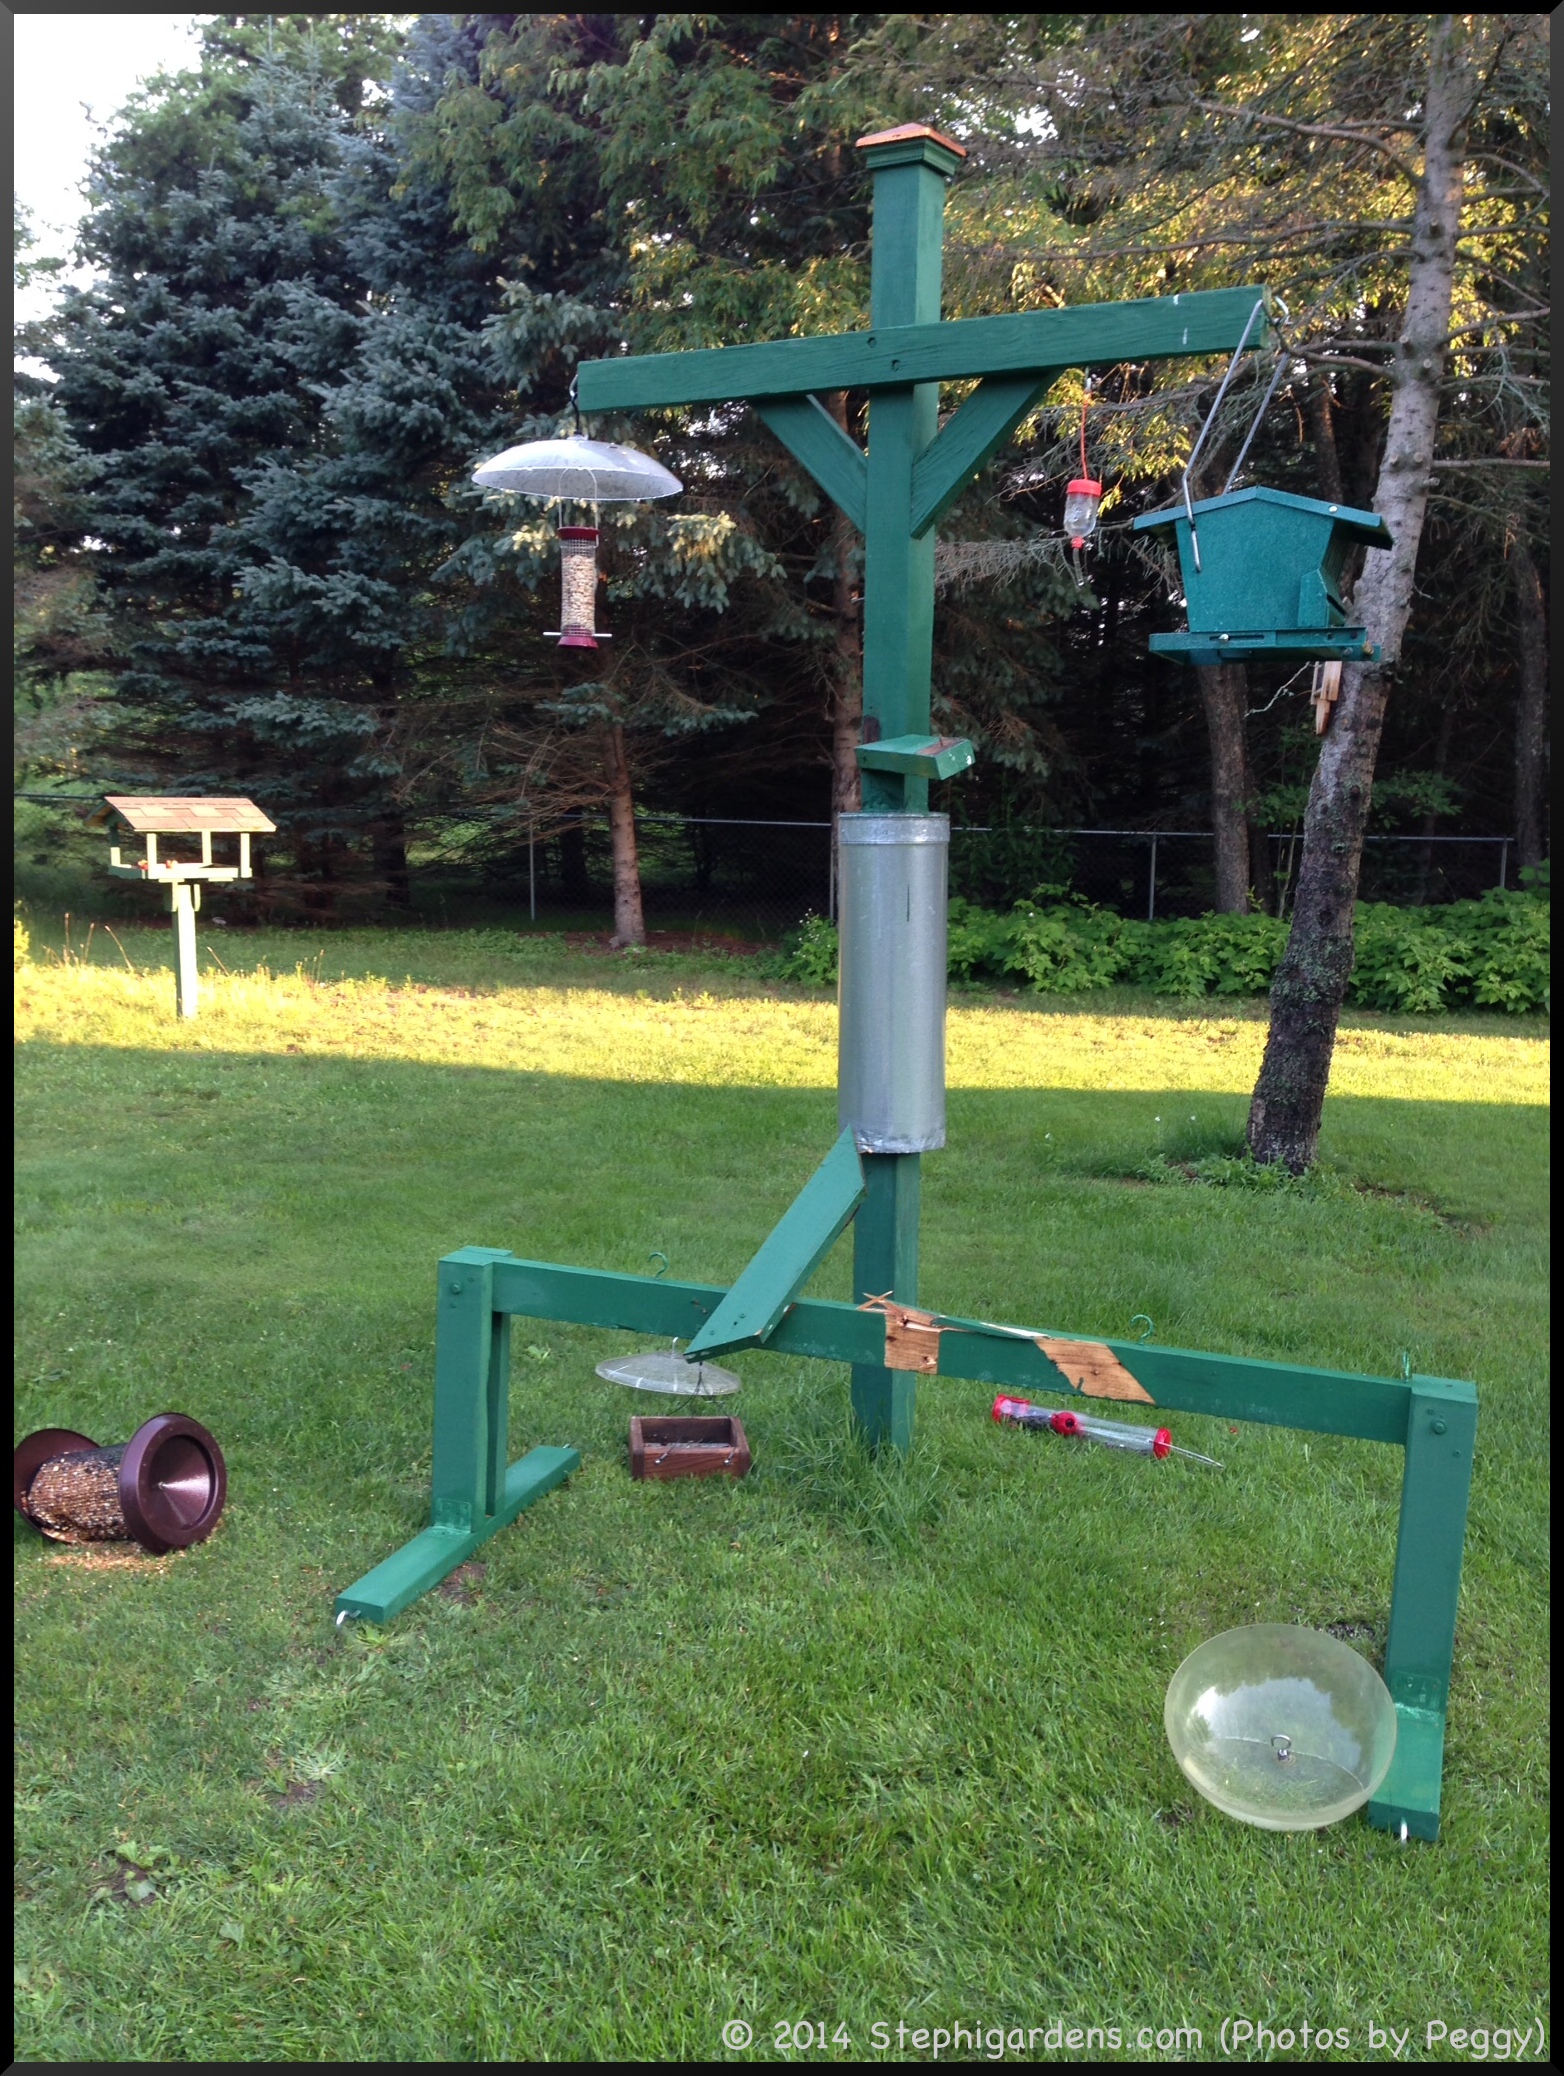
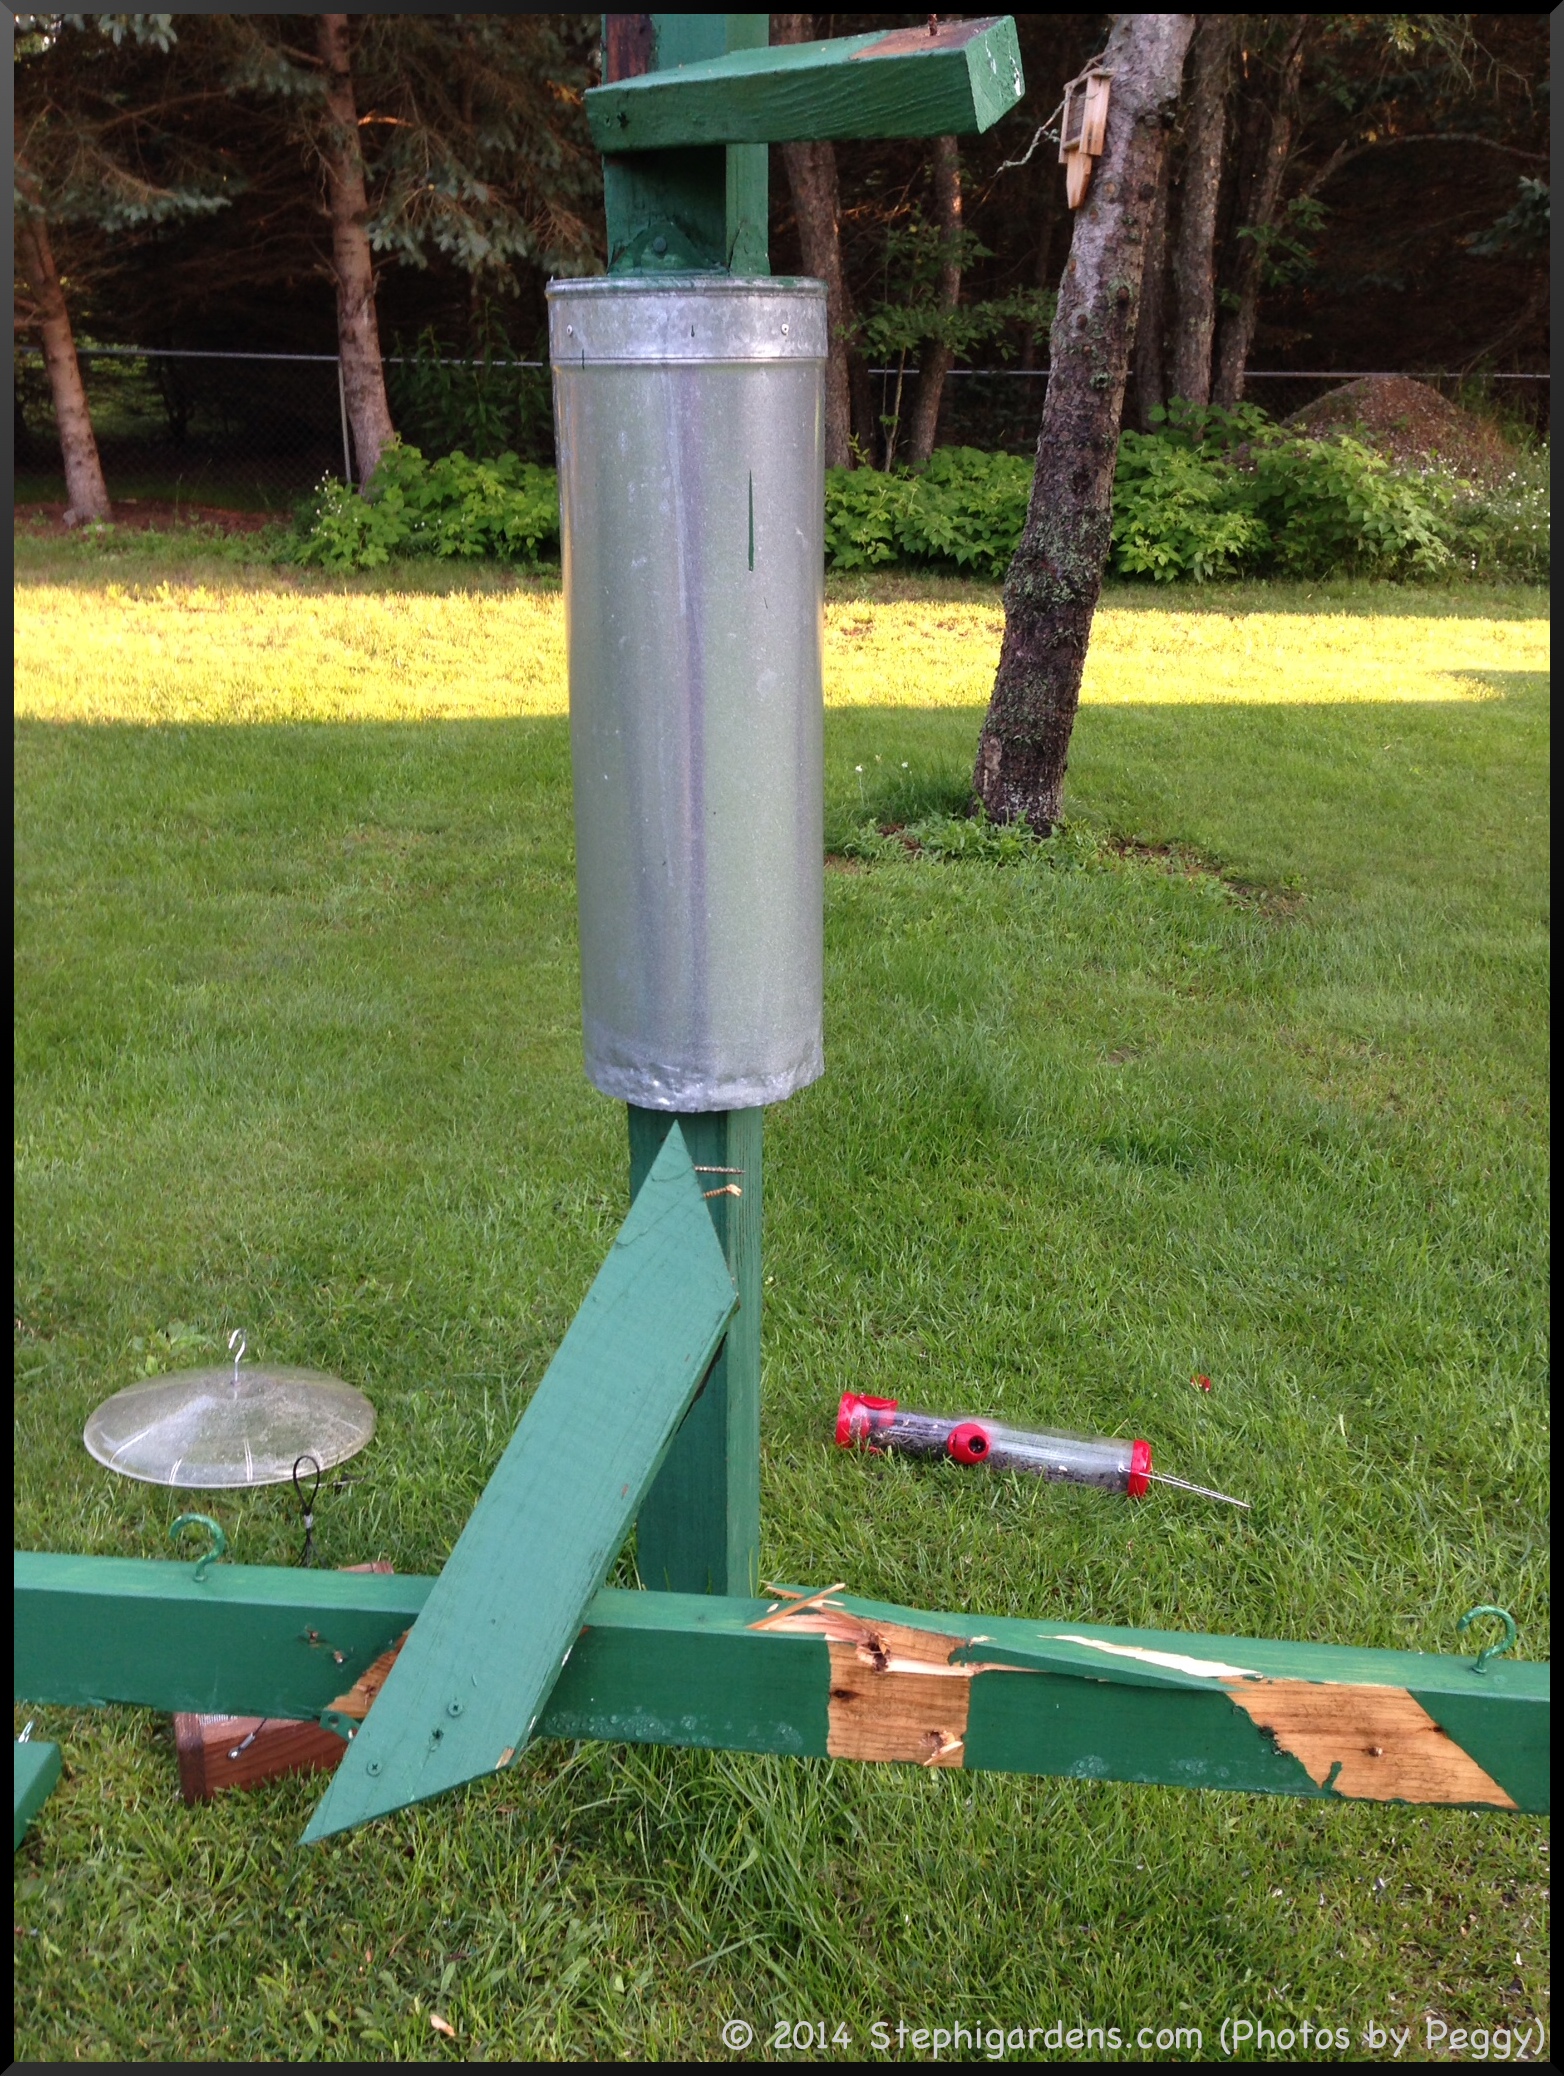
Never in the more than 10 years in her house had she ever seen anything like this.  The only thing that can do this kind of damage is a black bear.  And a very large, strong bear it must have been given the size and sturdiness of the feeder stand.  The cross beam had been ripped right off the bolts holding it on.

black bear damage


black bear damage

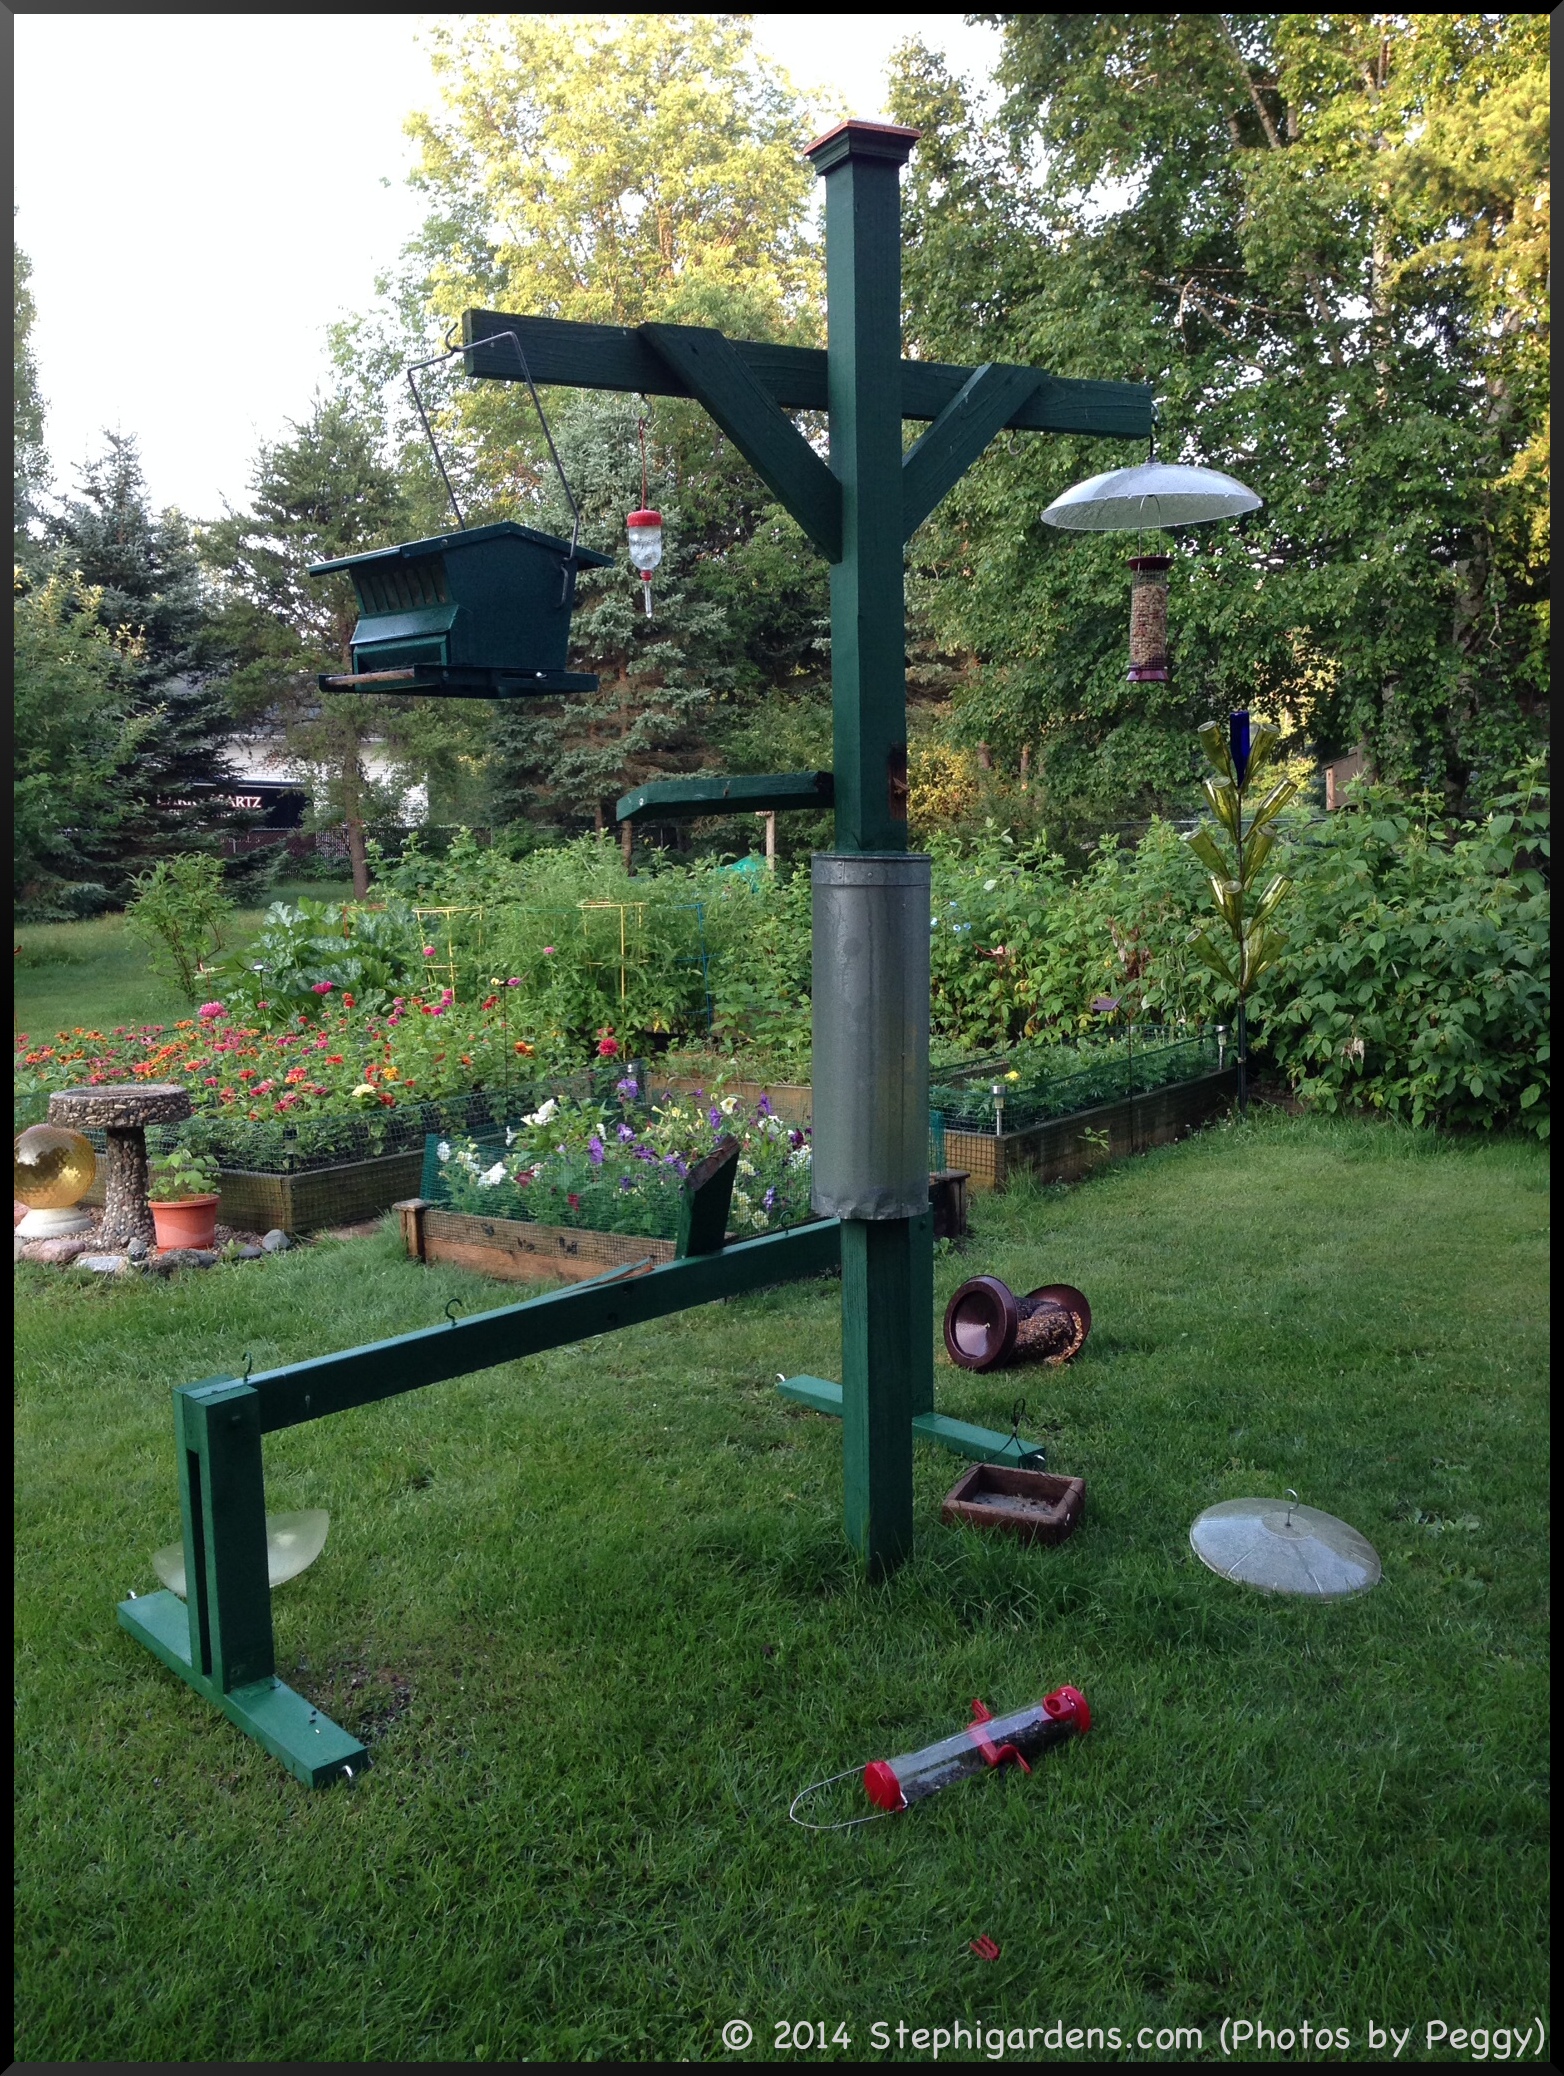
Feeders were ripped apart.

black bear damage

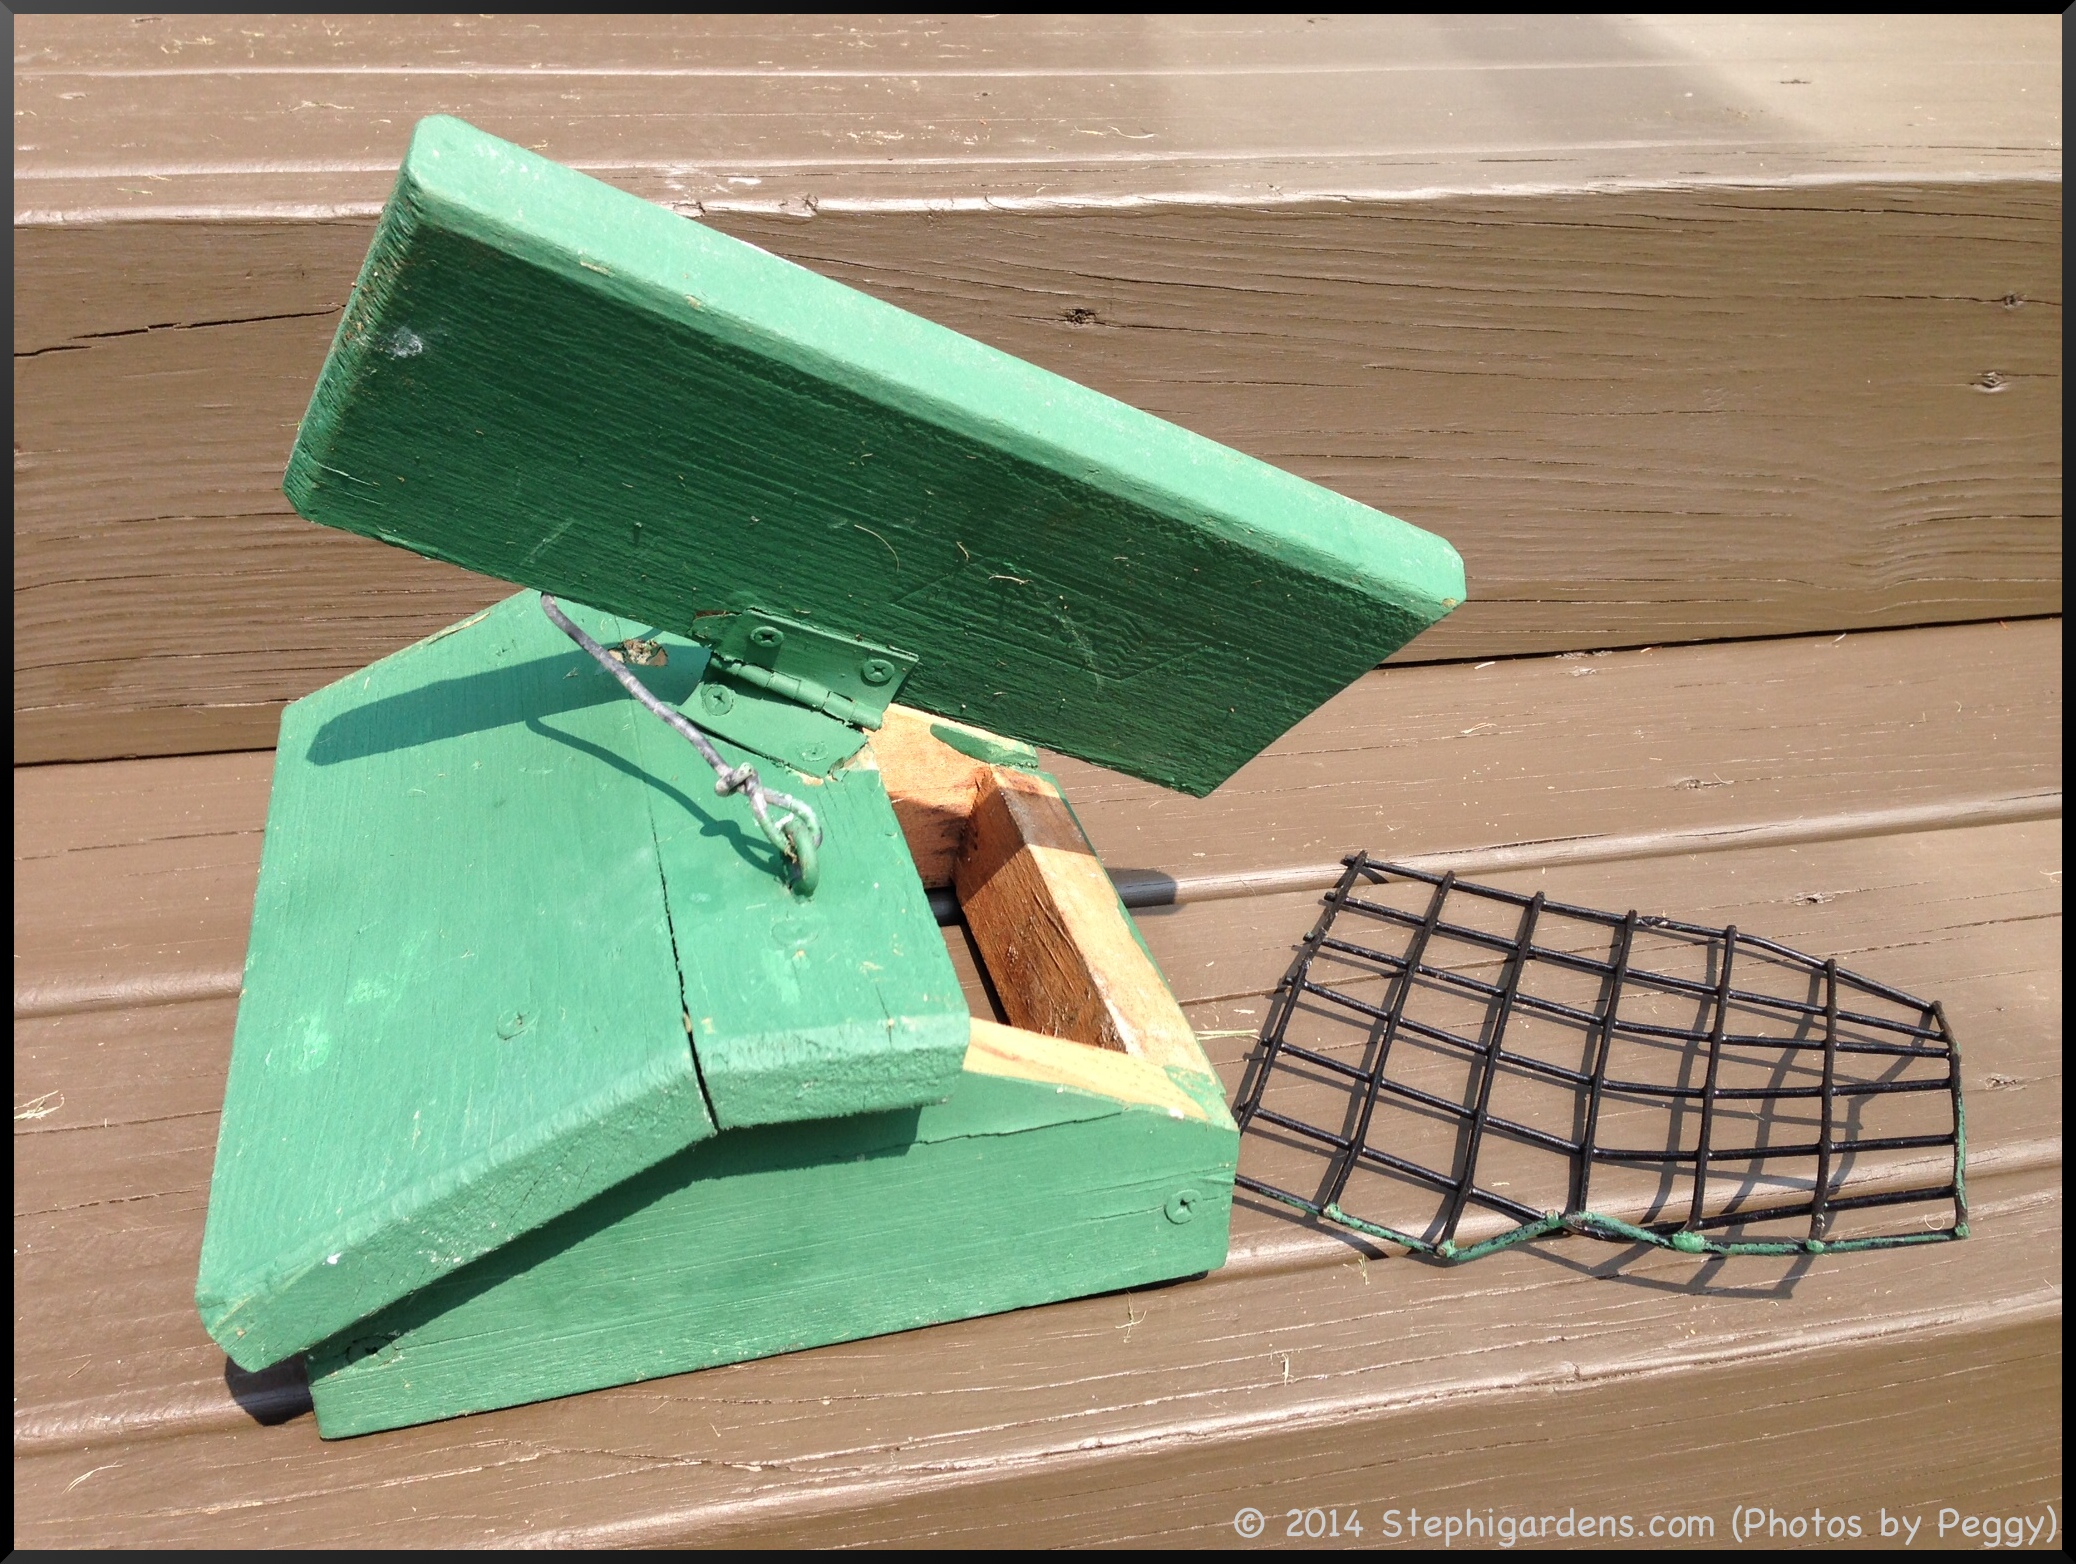
This homemade suet feeder was impressively ripped open, bending the old steel hinge and ripping off the wire cage.  This was actually the bear’s favorite.  He carried it off into the field behind her house where Nikki, Peggy’s dog, was able to track it down.

Black Bear damage

Peggy put out a animal-cam to try and get a photo of the bear if it decided to come back.  Mostly she just got shots of herself working in the yard and mowing the grass.   It took her while, and with the help of some friends she was able to get everything fixed and back together.

I’d like to show a “ta da look how great it looks’ photo,  but wouldn’t you know, the bear chose THAT NIGHT to come back again.  Not just to her feeder, but to a few others on the block as well.  Unfortunately, all she got on the animal-cam was a big black blur.

black bear damage


bird feeder

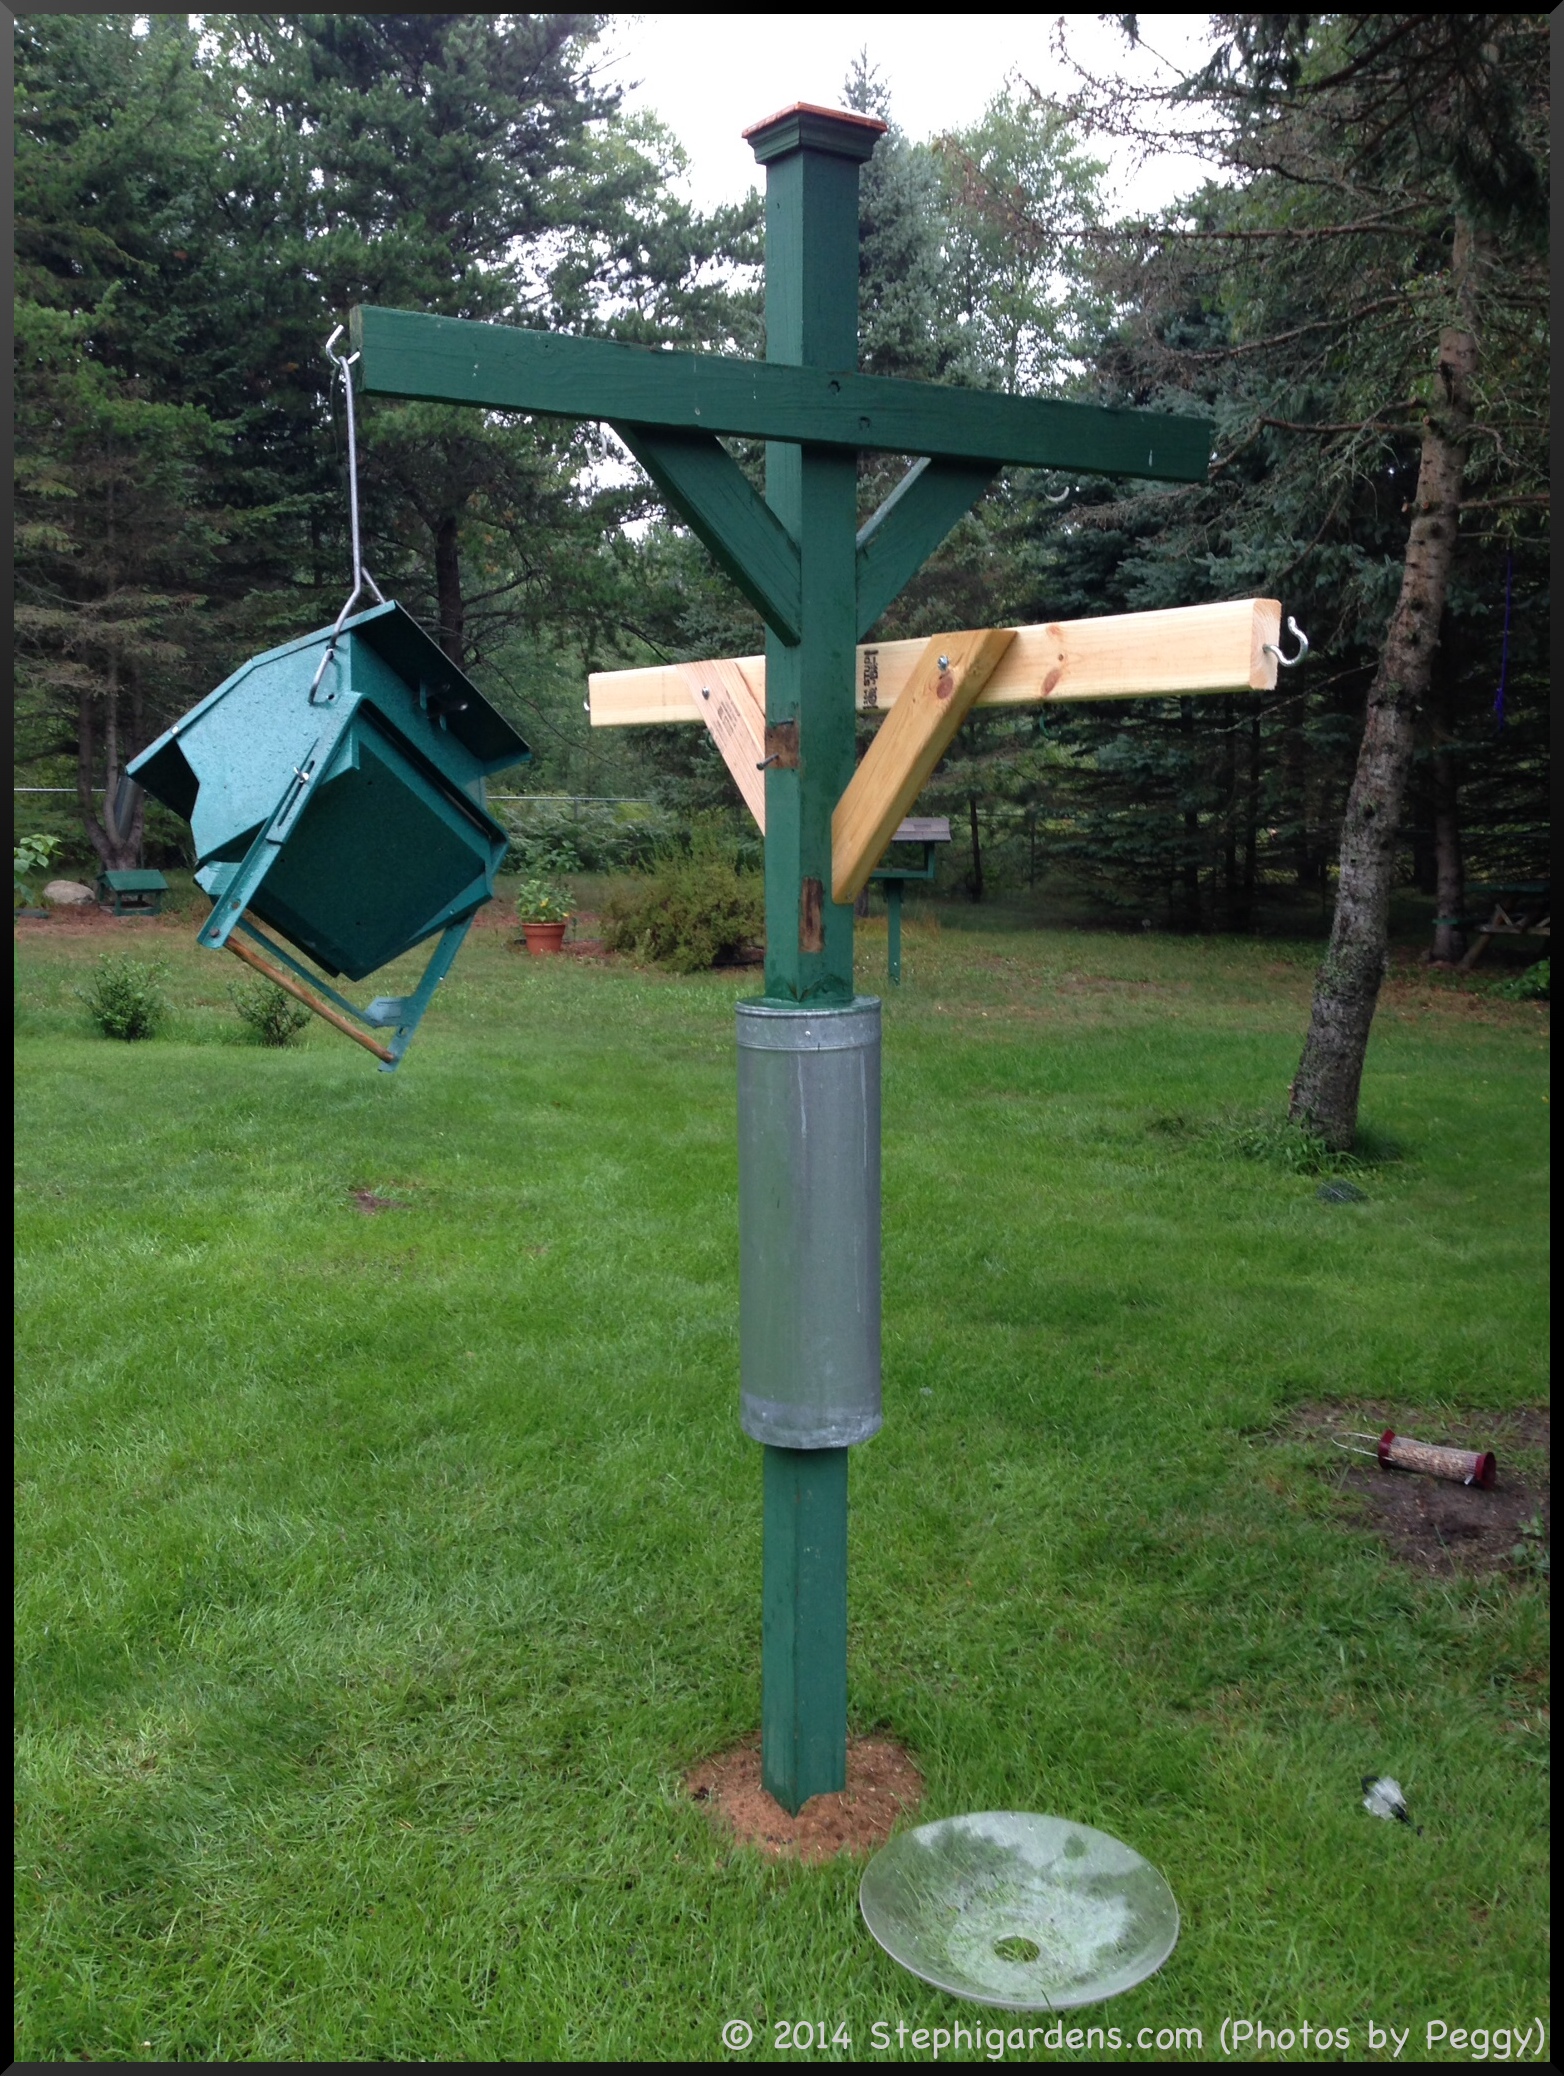
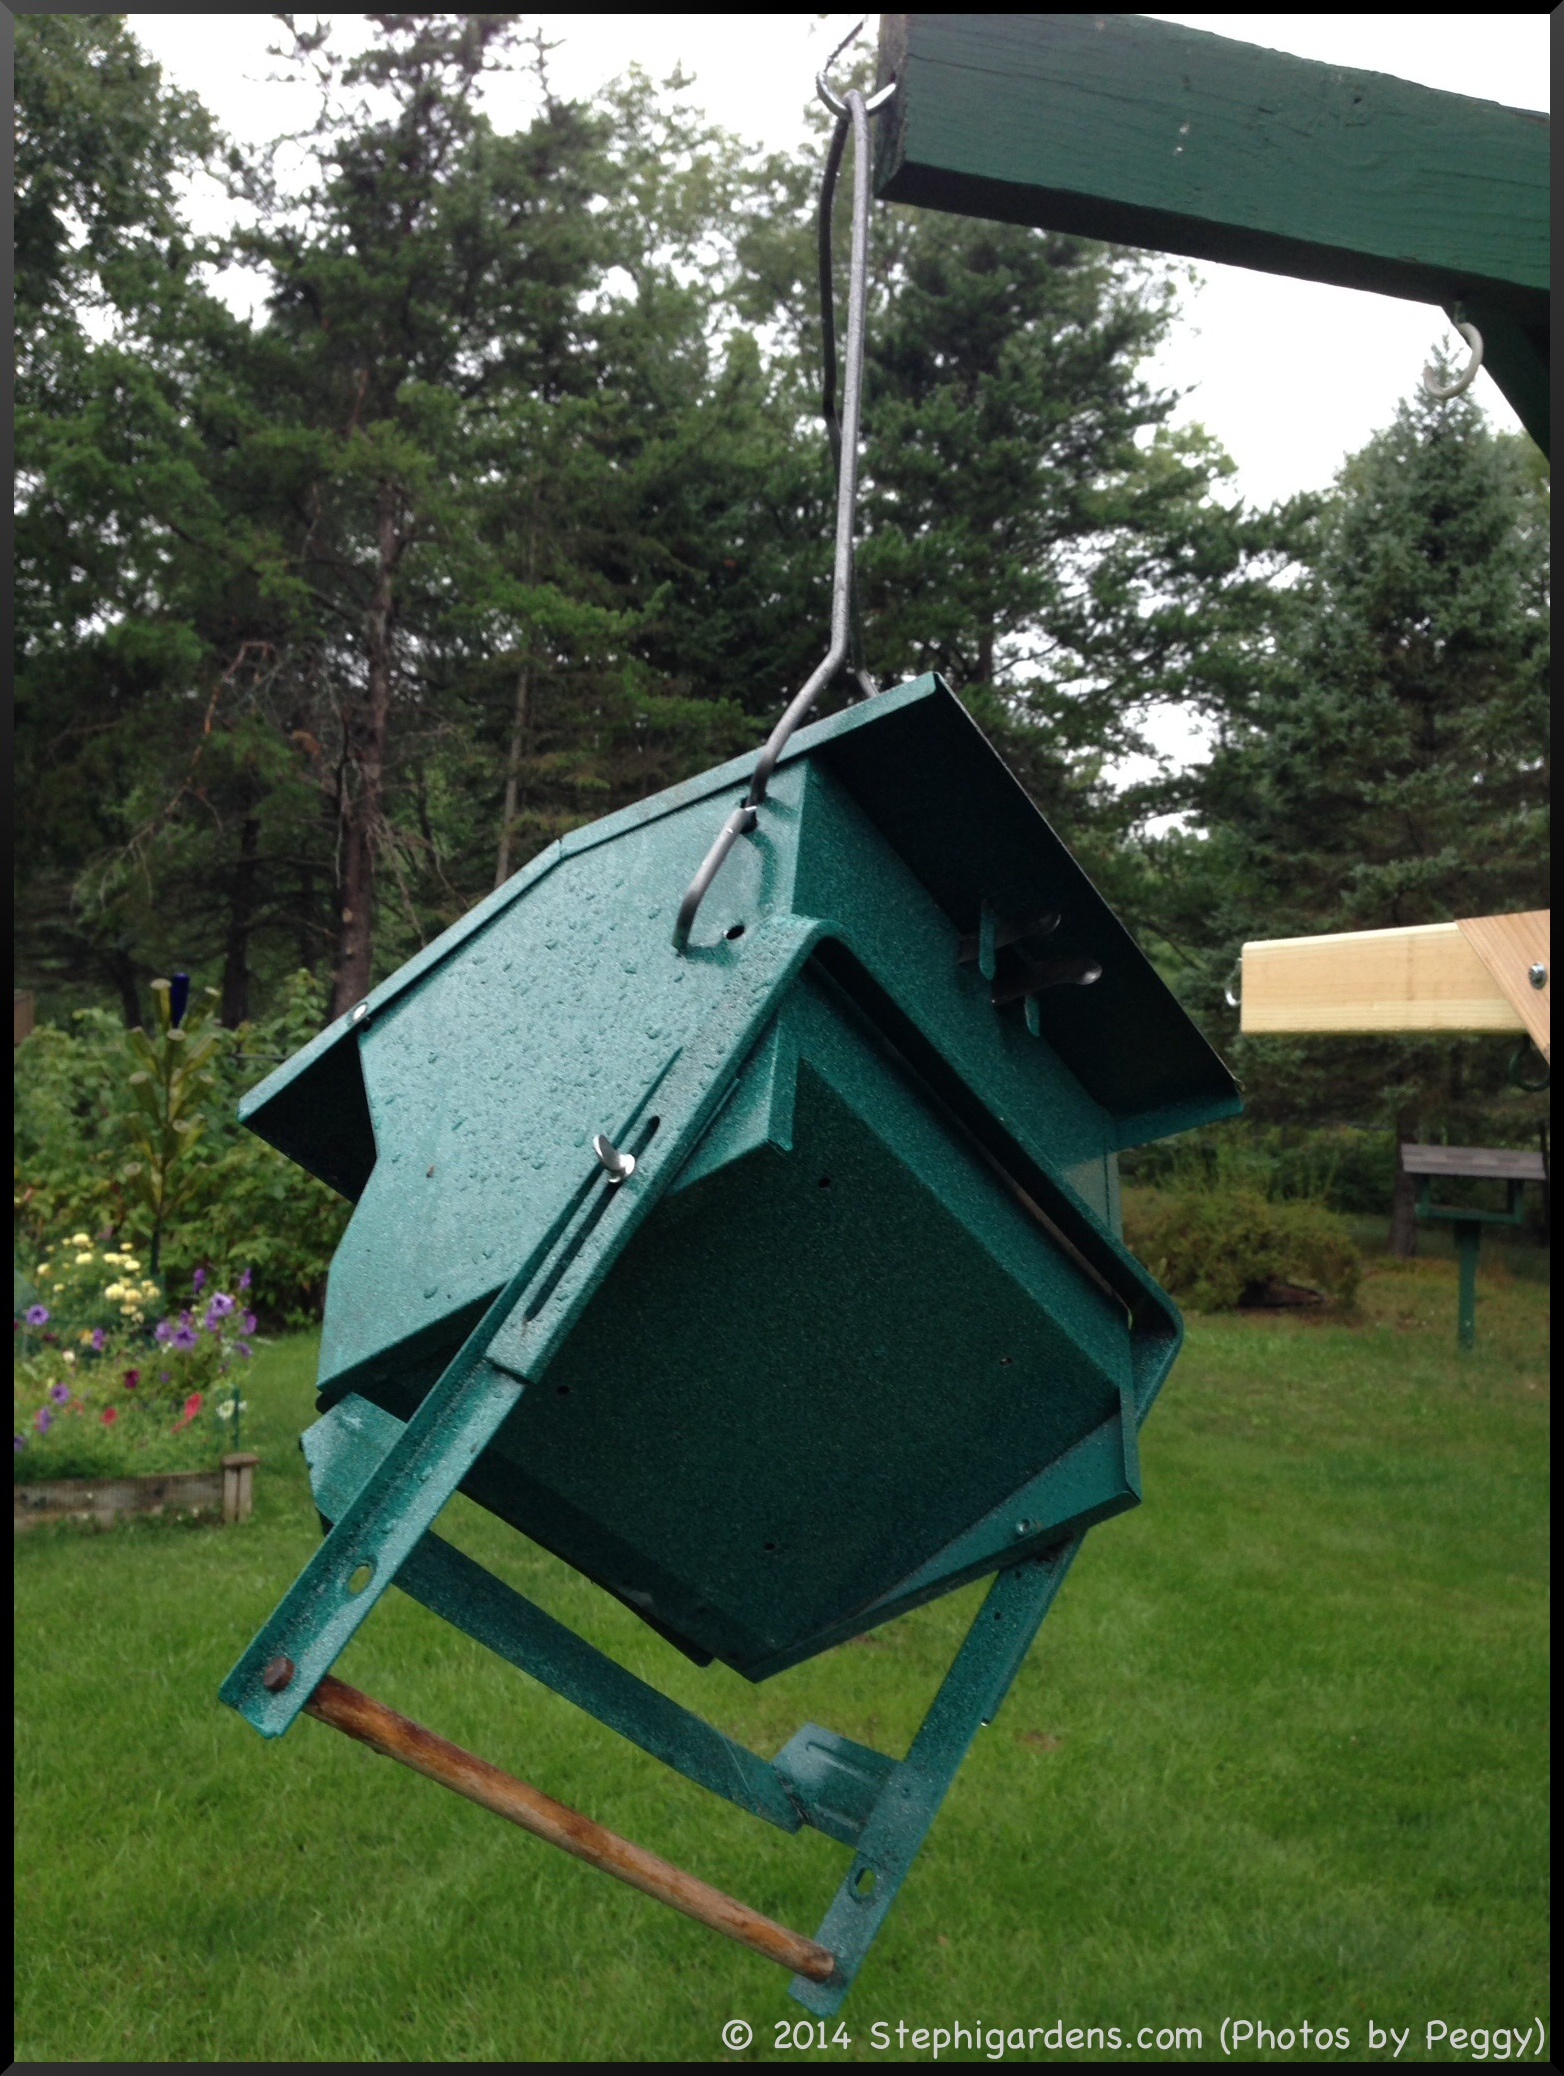
This time, the bear wasn’t able to rip down the arm, but did do some pretty bad damage to her more expensive feeders.  Again, with the help of friends, she was able to repair them and now takes them in every night.  It’s a nuisance, but having a bear visit your yard is a bigger nuisance.  Once it gets cold and the bears head into hibernation, she can start leaving them out again. Nikki will be happy too.  She hasn’t been too thrilled about going out at night.

Summer Stir Fry: Swiss Chard and Radish

We’ve tried so many delicious stir fry recipes this summer using vegetables fresh from my garden and the farmers market. One of my favorites is swiss chard and radishes. I’m not really much of a radish fan, but my daughter convinced me to try them sautéed, or in a stir fry. I’m hooked! What a mild, delicious taste the radishes have when sautéed.

Clean and trim the radishes and swiss chard.  
radish and swiss chard stir-fry

Cut the swiss chard stems into 1-1.5 inch pieces.  Quarter the radishes.  

radish and swiss chard stir-fry

Preheat stir fry pan with 1-2 T exra-virgin olive oil.  Add radishes and swiss chard stems.

radish and swiss chard stir-fry

Sauté  over medium heat until soft.  About 5-7 minutes.  While cooking, coarsely chop the swiss chard leaves.

radish and swiss chard stir-fry


radish and swiss chard stir-fry

When soft, add the leaves and sauté a minute more or so until leaves are wilted.  Season with salt and pepper to taste.  

radish and swiss chard stir-fry

Finished!  Yummy and healthy!

radish and swiss chard stir-fry

Powdery Mildew Attack

With the damp spring and summer we had, some powdery mildew was almost inevitable.  Question was, where was it going to hit?  The vegetables like squash, cucumbers, zucchini, or tomatoes, or the flowers like zinnias, sunflowers, or phlox?  Almost every plant is susceptible to this common set of fungi.   On most plants, it looks like a thin layer of dust, on others like tomatoes , it can cause yellow splotches on leaves.  No matter what it looks like, if bad enough of an infection it can kill the plant.

The best way to deal with powdery mildew is by prevention.  Use mildew resistant varieties, don’t overcrowd plants, and be sure there is enough air circulation.  If your plants do get infected, remove the infected plant parts, thin out the plants to improve air circulation, don’t water plants from above and try treating with a chemical fungicide or an organic method like neem oil,  or what I tried, a milk and baking soda solution.

This year it was my summer squash and zucchini  that became infected with powdery mildew.  I may have overcrowded my plants a little bit, well maybe more than a little bit, so I was almost inviting the mildew into my garden.  By the time I started to deal with the issue, I had a full blown powdery mildew infection.

summer squash


summer squash

Since the powdery mildew was in my vegetable garden, I especially didn’t want to use a non-organic way to treat it. First I got rid of as many of the badly infected leaves.  As I did this, I found that the leaves were truly covered in a thick layer of dust that flew everywhere as soon as I handled the leaves.  Yuck.

Once that was done, I needed to spray with some kind of fungicide.  Other than chemical means,  there doesn’t seem to be a lot of evidence that anything else really works well.   After a lot of research, I settled on spraying with a milk and baking soda solution.

Powdery Mildew treatment

I used:

2 cups water
1 cup milk (I used 2% but anything would be fine; it’s the milk protein, not milk fat that is the active ingredient)
3 Tbsp baking soda
squirt of Dawn dish detergent

Stir and put in some kind of spray bottle.
Spray on all infected and uninfected leaves every 10-14 days.

squash

After 2 weeks, many of the leaves were looking much better.

squash


squash

Unfortunately, the plants that were severely damaged ended up dying.  But, the ones I was able to rescue seemed healthy and have continued to put out squash and zucchini.

Next year, I need to be sure to get on top of this earlier.  Isn’t that true for many garden  issues?  I had success with the milk and baking soda solution on the less infected plants and will use it again next year if the powdery mildew comes back.   Many of the plants that failed were severely affected by the time I even started trying to do anything.   Again, early intervention is the key!

Did you have any powdery mildew issues this year?  How do you treat it?

August Sunflowers

In the back of my new raised beds, I planted a row of sunflower seeds. They have grown like gangbusters.

Sunflower

I love looking out the kitchen window and seeing these cheerful flowers lining the view behind the zinnias and marigolds.  The summer vegetables are hidden in between.

Sunflowers

Not sure why, but over the last couple of weeks many have tipped over.  Maybe not enough fertilizer to help grow strong roots, too close together, too windy or stormy?

Sunflower


Sunflower


Sunflower

But no matter, the flower heads keep facing the sun, despite the odd positions they find themselves in.

Sunflower


Sunflower


Sunflower

I staked some of them up so they didn’t lay on the ground.

Sunflower

Sunflowers

At at least 10 ft tall, I had to get creative with this giant one.  It was too tall for any of my stakes, so I got it nice and tangled in the tree branches.

Sunflowers

While the birds, chipmunks and squirrels have enjoyed the summer treat, I hope I have some heads left to put out this winter.

Harvesting the Cabbage

This was my first attempt at growing cabbage.  I never had the space before, so with the new vegetables beds I thought I would give them a try.  I first tried to grow them from seeds, but with the weird spring we had, like a lot of of my in-ground seeds I planted originally they didn’t sprout.  Luckily, I happened upon some organic seedlings at the nursery and planted them.  That worked much better.

The head is forming!

cabbage
You can see that the leaves had a number of holes in them. I never saw any cabbage worms, or other specific cabbage pests, and instead decided this was probably slug damage.  I put down some organic Sluggo slug and snail bait and that stopped any further damage.

This one is a little small, but ready.  You can’t visually tell when it’s ready.  A cabbage head is ready when when you give it a squeeze, it feels firm like a baseball.

cabbage

I was able to break the head off the stem, but if it’s got a really thick stem, use a knife to cut it off.

cabbage

Like everything I had read, cabbage take a fair amount of space.  I think mine were a little too close together, or maybe a little too shady.  I got 4 heads of cabbage, but they are really different in size.  The largest is about the size of a softball, the smallest, a little bigger than a golf ball.

cabbage

They should have all been the same, but that’s the fun of growing your own.  It’s rarely perfect.

cabbage

I used my first ever cabbage harvest to make my friend Kathy’s Freezer Slaw.   I used my own homegrown green peppers, but I had to buy carrots.  Bad year for carrots, great year for peppers.

freezer slaw

Did you grow anything new this year?  How did it turn out?


Save

Summer Gladiolus

Gladiolas

One of my favorite flowers of summer are gladiolus.  The are so majestic and intensely colored, I just love having them in the house.  The flower stand at the local farmer’s market didn’t return this year, but I’ve been able to find almost as beautiful bunches at the grocery stores.   This week’s selection is a gorgeous, deep purple.

Gladiolus


Gladiolus

In case you missed my post last summer on how to care for gladiolus last August, I’ve reprinted it here. (Gladiolus from the Farmers Market).

IMG_3260

Gladiolus are one of my favorite flowers to have around the house.  They are just so dramatic, colorful and cheerful.  With so many colors to choose from, it’s usually hard to decide.  If you’ve ever seen a field of gladiolus, it’s quite a sight!

My local farmers market has a wonderful local fresh flower vendor.  While maybe a little more expensive than the grocery store florists, the flowers are always super fresh and last longer in the vase. They also give wonderful flower care advice.  This is this week’s purchase and some of their advice.

Fresh bunch from the farmers market!
The flower vendor always offers to make a fresh cut with a super sharp chopper
The flower vendor always offers to make a fresh cut with a super sharp guillotine type cutter
Buy the bunch that seems to have the most color peeping out from the buds.  If there's color, it'll bloom. Closed up tight, it'll never bloom!
Buy the bunch that seems to have the most color peeping out from the buds. If there’s color, it’ll bloom. Closed up tight, it’ll never bloom!
Pinch off all the tips where the buds are closed up tight.  No sense making the stem waste energy on bids that won;t bloom.
Pinch off all the tips where the buds are closed up tight. No sense making the stem waste energy on bids that won’t bloom.
Taking off the tips makes the bouquet look a lot neater.
Beautiful, stunning display.  A few years ago, I finally invested in just the right sized vase to hold these flowers.
Beautiful, stunning display. A few years ago, I finally invested in just the right sized vase to hold these flowers.

Do you have a favorite gladiolus color?

Making Sauce on a Sunny Day

Now that it’s finally warm, it’s the perfect time to make some tomato sauce with the beautiful garden tomatoes. Well not really, but this has been a great year for my tomatoes and I need to get them harvested. I have lots of tasty San Marzano Roma, Early Girl slicing tomatoes and tons of Super Sweet 100 cherry tomatoes.

I picked about 5 lbs of San Marzano and Early Girl tomatoes and processed them with my new toy, an Oxo Food Mill.

food mill

Last year to prepare the tomatoes, I par-boiled them, removed the peels and seeds, and then processed them in the food processor to puree them for sauce (see 35 Pounds of Tomatoes for directions).

I kept reading about food mills as a better way to prepare tomatoes (and apparently mashed potatoes), so I thought I’d give it a try this year.  It’s actually pretty easy to use and makes perfect puree.  I also think it’s even more efficient at making puree than the way I prepared the tomatoes last year, since it seems like I ended up with a lot more sauce than before (and fewer seeds).

Here’s some tips I learned:

  • The medium grate was just the right size to get a thick puree without seeds.

oxo food mill

  • I found it was faster if I par-boil the tomatoes for about 1 minute.  Then put tomatoes right into the mill.  About 5-6 fit in at a time.

food mill

  • I made a slice in each tomato once in the food mill to make the process even a little easier.

food mill

  • Be sure to go both forwards and backwards.  You need to clear it periodically to get the chunks mixed up and under the press.
  • It’s done when you are only spinning skins under the press.  Be patient, it’ll happen.
  • Scrape out the peels with a fork and put another batch of tomatoes in.
  • It doesn’t really take any strength to use this.  It’s really just spinning the handle.  I was worried with a bit of a bum shoulder this would be hard.  Not at all.

Now I was ready to make my sauce.  Last winter, I used my frozen tomatoes and played around with recipes.  This was ultimately my favorite.  The longer it cooks the better it tastes.

For 8 cups of tomato puree (about 3 lbs of tomatoes):

2 medium onions, grated
2 tablespoons butter
2 tablespoons olive oil
4 teaspoons Penzys Italian Herb Mix
4 garlic cloves, minced
8 cups fresh tomato puree
4 tablespoons fresh basil, chopped
salt and pepper to taste

Melt butter and heat oil in a large stockpot over medium heat. Add grated onion and Italian Herb Mix. Sautee 7-8 minutes over medium heat, until onions are soft and golden minutes. Add minced garlic and cook 30 seconds or so until fragrant. Add tomatoes. Bring to a boil, then cover and simmer on low heat for at least 1 hour. Longer for a richer taste.  Before serving, stir in fresh basil, season with salt and pepper to taste. Serve over pasta.

**If you like a smoother sauce, use a hand blender to blend the sauce when finished cooking.
**If freezing the sauce, leave out basil. Add fresh when warming thawed sauce.
**We eat a fairly low sodium diet. This is flavorful without salt, but if you prefer your sauce with salt, add desired amount to taste with the pureed tomatoes.

tomato puree
Puree is ready to add
Onions and spices are cooking beautifully.  Kitchen smells great!
Braun Stick Blender
Use a hand bender for a smoother sauce

Now that I’ve cooked up all the garden tomatoes, I’ve moved on to the 10 lb box of Roma tomatoes from the farmers market.  Getting ready for winter already 🙁

Fresh Tomato Pasta Sauce
Print
Author:
Ingredients
  • 2 medium onions, grated
  • 2 tablespoons butter
  • 2 tablespoons olive oil
  • 4 teaspoons Penzys Italian Herb Mix
  • 4 garlic cloves, crushed
  • 8 cups fresh tomato puree
  • 4 tablespoons fresh basil, chopped
  • salt and pepper to taste
Instructions
  1. Melt butter and heat oil in a large stockpot over medium heat.
  2. Add grated onion and Italian Herb Mix. Sautee 7-8 minutes over medium heat, until onions are soft and golden minutes.
  3. Add minced garlic and cook 30 seconds or so until fragrant.
  4. Add tomatoes. Bring to a boil, then cover and simmer on low heat for at least 1 hour. Longer for a richer taste.
  5. Before serving, stir in fresh basil, season with salt and pepper to taste. Serve over pasta.
Notes
**If you like a smoother sauce, use a hand blender to blend the sauce when finished cooking.
**If freezing the sauce, leave out basil. Add fresh when warming thawed sauce.
**We eat a fairly low sodium diet. This is flavorful without salt, but if you prefer your sauce with salt, add desired amount to taste with the pureed tomatoes.


August Garden Surprises

I took a walk around the yard today just checking everything out. It must have been a while I’d done that, since I had quite a few, luckily mostly pleasant, surprises.

This Rose Of Sharon has always grown in the shadow of surrounding trees which are no longer there.  I never understood why it was planted there and remained quite a runt and hardly flowered.  We left it since it was back in a corner and not hurting anything.   Not this year!  With all the new sun and space, it has flourished and has been blooming like gangbusters.

Rose of Sharon


Rose of Sharon


Double Bloom Rose of Sharon

Next to the big Rose of Sharon is a small one I bought on clearance.  It was in even more shade and really never grew much.  It was pretty much overrun by hosts and ferns.  All of a sudden this year, it started blooming.  It’s flowers are the more traditional hibiscus looking type.

Rose of Sharon

Then there’s this white Rose of Sharon that just appeared from nowhere.  I thought it was a weed growing up next to the fence.  Kept cutting it back, but it was quite persistent.  After apparently not weeding for while, it unexpectedly flowered!!  My persistent weed was a very pretty white Rose of Sharon.  It actually picked a pretty spot to grow, so this one is staying put.   I also finally know what all those persistent weeds/baby trees in less desirable locations around the yard are.  I am a bit puzzled though where this one came from.   It must be a traveller from a neighbor’s yard since all the Rose of Sharons in my yard are purple.

Rose of Sharon

I apparently really haven’t weeded very much lately and this huge thistle has grown about 6 ft tall behind the white David phlox.  I would have pulled it out, except that it is was being visited by some lovely bumblebees and goldfinches.  I think it’ll stay for the summer.

Thistle

Last fall, I had moved some plants around so this spring, when things were coming up, I wasn’t entirely sure what and where things were.  Early on,  I saw these little grass like leaves that I couldn’t decide if they were weeds or flowers.  I let them be since they weren’t too obnoxious.  Just this week, they finally put out a single daylily bloom.  Seems that some Happy Returns day lilies had found a new home.  Reminds me that, “When in doubt, don’t pull it out!”.

Happy Returns Daylily

I have 2 Knock Out Roses that are a few years old.  They’ve struggled with Japanese Beetle attacks, and then this past winter really did a job on them. They looked pretty haggard, but I left them alone to see what would happen.  Finally, one is putting out a few blooms.  I’m going to trim off the dead stems and be extra vigilant about the Japanese Beetles.  Hopefully the plant will be strong enough to come back healthier next year.

Knock Out Rose

I”m not quite sure why my 1 year old Wine and Roses Weigela is blooming a second time this season.  In any case, it’s healthy and looking great in this spot.

Wine and Roses Weigela

While I don’t have any pictures, I am excited to have seen a few hummingbirds in the yard recently.  They haven’t come to the feeder, so either they don’t like my food selection or there’s enough natural food for them.

Hummingbird Feeder

Last, but not least in my opinion, are these French Favorite Marigolds from Botanical Interests  that I grew from seeds.  I have never had such beautiful marigolds grow in the spot (and for as long as we’ve lived here, this has been my marigold garden).

French Favorite Marigold

Have you had any pleasant garden surprises this year?

Busy Beaver

beaver chew

I was out on a bike ride recently with Steve and my mom on the White Pine Trail State Park in Cadillac, Mi. This is a beautiful, partially paved trail extending from Cadillac to Grand Rapids. On this day’s ride we rode from Cadillac to Tustin, about 20 miles round trip.

When my mom and I are riding, our rides tend to be a bit of a scenic  tour and we stop a lot to check out things we see. Today, we spent a while looking at a pond with a lot of recent beaver activity. From the looks of it, they have really have been busy beavers!

IMG_7305

You’d have thought loggers had been in this area and in a way they were. The beavers take down these trees to use them for food and building dams and lodges.  Beavers have been been reported to be second only to humans on their ability to alter their environment for their own needs.

beaver chew

beaver chew

beaver chew

Some fresh activity.  Hopefully it doesn’t fall across the trail.

beaver chew

There is a beaver lodge on the pond that was visible earlier in the season before everything leafed out.   On a nearby pond, there was a lodge that looked a bit abandoned.  Maybe they’ve moved down the trail to this pond?

beaver lodge

Since I am writing about beavers, I wanted to relay another story from the same bike ride.  Fellow geocachers out there will enjoy this.

We were looking for a cache that had been reported as missing.  When we arrived at the spot where it should have been, there seemed to be something wrong.  The area looked different, and the pine tree that the cache was supposed to be attached to just wasn’t there.  Maybe we were in the wrong spot? Or remembering the location wrong?  Nope!  A beaver had visited the spot, cut down the tree and stripped the branches bare.  The oddest part was that he had taken down a pine tree.  Why would a beaver want to chop down a pine tree?  That would be quite unusual.  We left puzzled and laughing at what we had discovered.

He took this down and shredded all the branches off.  The cache was gone.

beaver chew

Want to learn more?
Beavers:  Pictures and Facts 
Beavers, Wetlands and Wildlife
The Beaver Solution

Curled Leaves on the Bushes

Earlier in the spring, I began to notice that many, but not all, of my bushes in the front yard (Dwarf Korean Lilacs,  Judd Viburnum, Boxwoods, Burning Bushes, Annabelle Hydrangea) were looking a bit unhealthy. Their leaves were oddly curling and looking dry, even though we’d had plenty of rain. The worst was one of the Burning Bushes and large sections of the lilacs.

Annabelle Hydrangea


Burning Bush


Dwarf Korean Lilac

Not knowing what to do, I called my tree and shrub caretaker to come and take a look. He diagnosed it as mealy bugs and mites, although I had trouble seeing what he saw.  Looking into it some more, it seems it could have also been related to any number of other pests, or even incorrect watering or fertilizing.  No matter the reason, it was clear from the symptoms that something was literally sucking the life out of the leaves and they needed to be treated or the shrubs could die. He recommended spraying with a pesticide/fungicide combo to cover all the bases. I don’t usually like spraying nonspecifically, but whatever the problem was it was affecting a number of specimen shrubs in my front yard that were already stressed from the harsh winter.  I had already lost one large burning bush to mites a couple of years back and I didn’t want to chance losing all these bushes this year, so went ahead with the sprays.

Just recently, I finally started to finally see some new healthy growth on the shrubs and no further damage.  Some of the curled leaves uncurled, others remained curled, but stayed green and didn’t appear to be any further damaged.  Crisis averted for this year.

annabelle hydrangea

Burning Bush


dwarf korean lilac

Have you ever seen anything like this?  Any suggestions as to the cause?